

Starting a count
From Counts & adjustments, click Start count. A count covers one location, optionally narrowed by vendor, product type, or tag. Those filters combine, so vendor “AudioGear” plus type “Headphones” counts only items that are both. As you change them, Stockful tells you how many SKUs the count will cover, so you find out it is seven thousand lines before you start rather than after. The scope is fixed once the count is created. It decides which lines exist, so changing it later would make it a different count. It stays visible on the sheet so a finished count can always say what it covered.If other counts are already open at the same location, Stockful lists them before you start. Two counts at one warehouse is perfectly normal - different people, different shelves - but starting a second one by accident is easy when the first is on another screen.
Blind counting
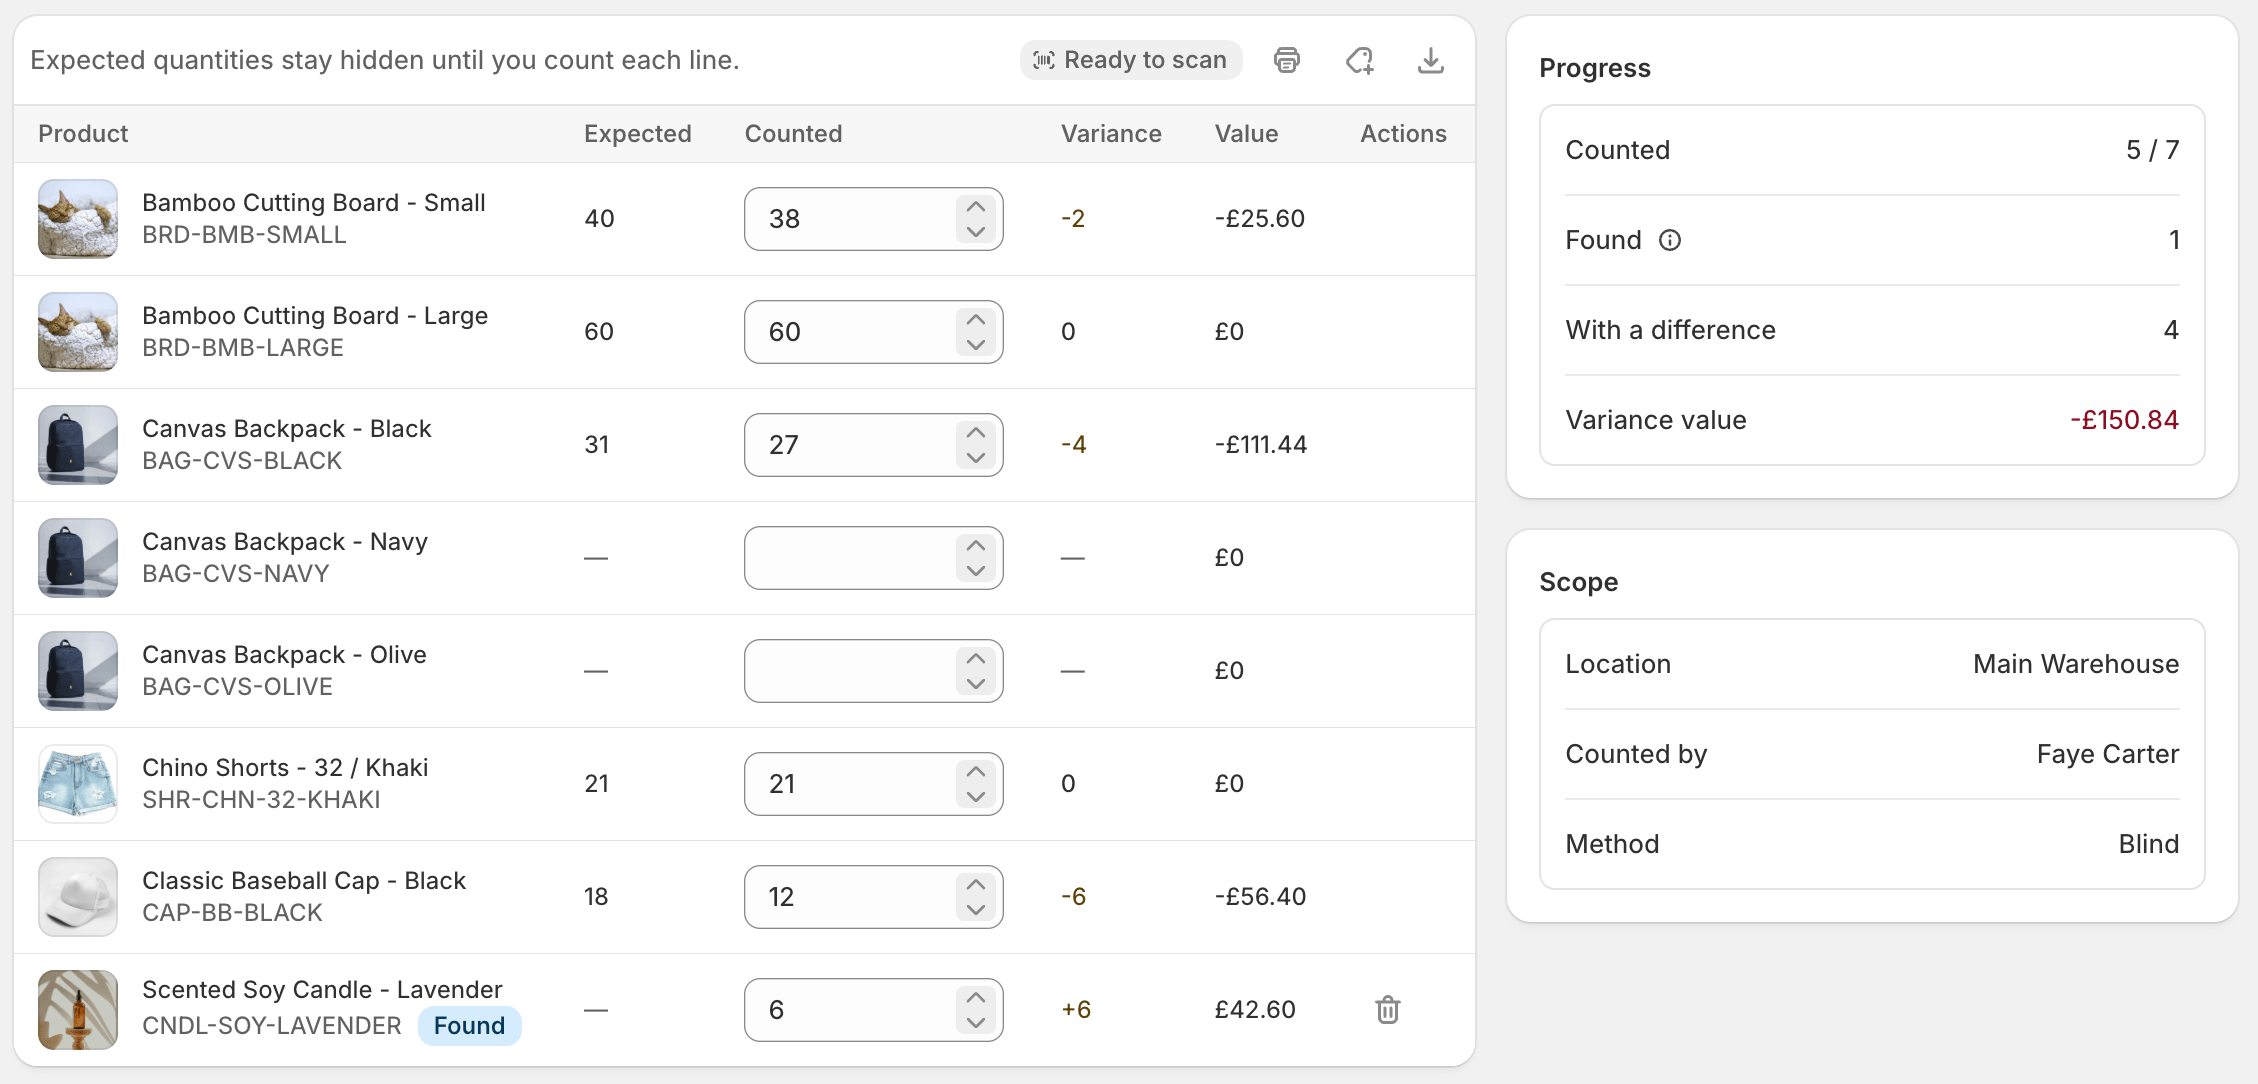
Blind counting is on by default, and hides the expected quantity until you have entered your own. Once you enter a number, the expected quantity and the variance appear. This is not busywork. Shown “50”, a counter who counts 48 tends to write 50 - the number on the screen quietly becomes the answer. Withholding it until you have committed is the accepted way to get an accurate count, and it is the whole reason a count is worth doing rather than eyeballing. Untick it if you would rather see expected quantities from the start, for example when recounting a short list you already know is wrong.The count sheet
The sheet lists every SKU in scope with a Counted field. Fill them in as you work; the sidebar tracks how far through you are.- Expected - what Stockful believes is there. Hidden on a blind count until the line is counted.
- Counted - what you found. Leave it empty for anything you have not reached.
- Variance - counted minus expected, filled in once you have counted.
- Value - what the variance is worth, using the item’s cost.
Count sheets by CSV
Click the import button to download this count as a CSV - one row per SKU on the sheet, with its SKU, barcode, product name and a Counted column - or to upload a filled-in one. Anything you have already counted is in the file; everything else is blank. The expected quantity is never included, so a blind count stays blind. Take it away as a spreadsheet or a printout, fill in what you counted, upload it, and Stockful maps the rows back onto the sheet. Column headings are detected automatically, so most formats work as they are, and a row is matched on its barcode when it has no SKU. A row you leave blank stays uncounted, exactly as it would on the sheet. Only a number counts, and that includes 0: type it for a shelf you checked and found empty. The preview tells you how many rows were left blank. Rows that cannot be filled in are flagged and skipped rather than silently dropped:- No matching item - the SKU or barcode is not in your catalogue.
- Not a whole number - the Counted cell holds something other than a number, such as “12 boxes”. It is refused rather than read as zero.
- Not on this count - the item exists but the count’s scope does not cover it. If you found stock of it, add it as a found item instead.
Scanning barcodes
Any barcode scanner that types like a keyboard works on the count sheet. There is nothing to switch on and nothing to pair: scan an item and its Counted goes up by one, so counting a shelf is one scan per unit rather than a trip back to the keyboard. Scan something the count does not cover and the found item search opens with the barcode already filled in, ready to add. Scan a barcode that two items share and Stockful shows you which ones instead of choosing for you, because picking the wrong one would write the wrong stock. The toolbar above the sheet says whether scanning is live:- Ready to scan - scans are reaching Stockful.
- Click the page to scan - the Shopify admin has the keyboard rather than Stockful, so a scan would land there instead. Click anywhere on the page and it clears. This is normal right after you open a count from the admin’s own navigation.
Scanning with a phone camera isn’t possible. Shopify doesn’t give embedded apps access to the camera, so a handheld scanner - USB or Bluetooth - is the way to scan.
Found items
Sometimes you find stock on the shelf that the count does not cover: the filters excluded it, or Shopify does not hold that SKU at this location at all. Click Add found item on the sheet and search your whole catalogue by product, SKU, or barcode. The picker tells you whether the location already stocks each item, and anything already on the count is left out so you cannot add it twice. Found items are added uncounted, and you type the quantity into the Counted column with everything else. They sit below the scoped lines with a Found badge, and their Expected reads as a dash, because nothing was expected there at all. Unlike scoped lines, a found item can be removed from the sheet - it is one you added, and picking the wrong variant is easy. A few items cannot be added, because Shopify will not let anything adjust their quantity: variants with no SKU, bundles, and items managed by a third-party fulfilment service.Applying a count
Apply count writes the variances to Shopify. You get a confirmation summary first, and if you have unsaved counts they are saved as part of applying. What gets written, and what does not:- Only the variances. A line counted at exactly the expected quantity is a real, useful result, and it is recorded on the count - but there is nothing to move, so nothing is sent to Shopify.
- Uncounted lines are left alone. They are not treated as zero unless you ask for it. Stock nobody looked at is not stock that has gone missing.
- Found items are applied last, after everything the count set out to cover.